Tuesday, December 20, 2016

Holiday Ornaments!


Hi there!  I'm back again today with an idea for a project which I've borrowed from Judi Kauffman and changed to utilize the A Way With Words dies.  You may see her gorgeous projects and ideas HERE.


I simply filled the balls with snowflakes snipped from an inexpensive coiled decoration and a bit of kraft packing. The top of the ornaments were decorated with bits of string and ribbon and diecut foliage (all diecuts from Elizabeth Craft Designs).  Season's Greetings was cut from Shimmer Sheetz and in real life is a better match to the snowflakes inside than I could catch in the photograph!

A Way With Words dies   Quietfire Site | Elizabeth Craft Designs

I hope this gives you some ideas for using up those empty Christmas balls and creating a little cheer with bits and pieces!
Happy creating and Merry Christmas, Suzanne

Monday, December 19, 2016

Wrap it up with AWWW Merry Christmas!


Hi there!  It's Suzanne today sneaking in a giftwrapping project to share with you.  It was supposed to be posted on the weekend, but some other things got in the way.....

I've been wanting to try die cutting fabric with the A Way With Words dies.  Robyn has done some experimenting with fusible interfacing and while I'm thinking of it, we must discuss it further!  I was talking to my friend Jacoline about it and she said why not just use double-sided tape?  Well.  Duh, yeah.  Brilliant thinking! 

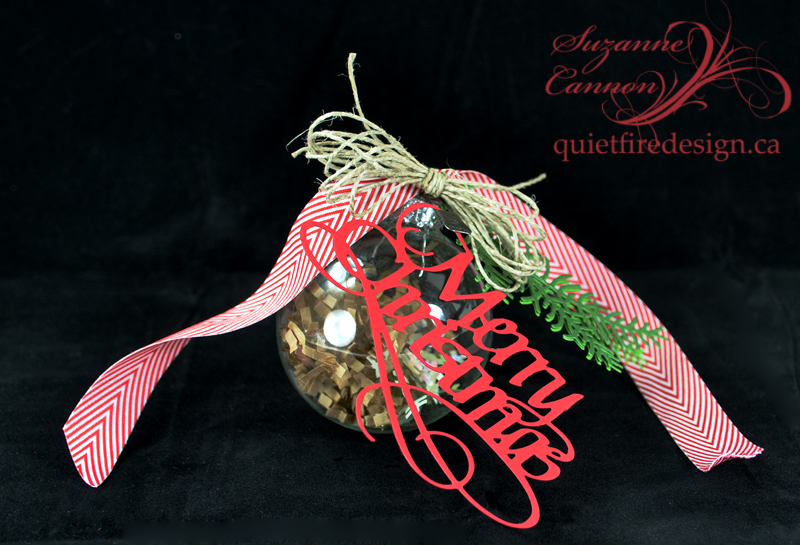
This project was quick and easy, so I won't write step by step instructions. I simply cut a piece of Clear Double Sided Adhesive (Elizabeth Craft Designs) large enough for the die.  I peeled the release paper off one side and smoothed on some burgundy silk that I'd had for years.  It has a natural crinkle in it.  Don't choose a fabric like that - but it did work out okay. 

Diecut the fabric.  Now the tricky part.  Peel the release paper off the back of the fabric Merry Christmas.  It comes off fine, but there is not a lot of stiffness there, so peel from one side and adhere it to the gift bag as you roll off the release paper.  And Wow!  It worked!  

Keep in mind it won't hold up to washing, as it would if you used fusible web.  But this technique took no time at all.  I didn't have to get out an iron and fuss with that - AND the final product looks sweet!

The little canvas bag comes from Canvas Corp, the tiny bells and pine cones are Stampin' Up (from my friend Jacoline), the ribbon is hand dyed with Aged Mahogany Distress Ink and well, the cinnamon stick comes from the grocery store!
Go ahead - wrap it up!  Merry Christmas!

Thanks for visiting.  Happy creating, Suzanne

Saturday, October 1, 2016

Welcome to World Card-Making Day 2016

The Quietfire Design Team has made some cool cards to share with you to celebrate this World Card-Making Day!   There are some prizes, too!
All you have to do to be eligible to win a prize is to leave a comment on each blog before midnight, Sunday October 2, 2016.
 
Here is my project!  I hope it gives you some ideas for your own creations. 


Instructions:
  1. Form an 8.5 x 5.75" tent-fold card base from rusty orange cardstock.  Die cut Autumn and Thanks from Scotch and Rich Amber cardstock.  Die cut the Grapevine Wreath from brown cardstock and the leaves from yellow and orange cardstocks.
  2. Die cut a 4" square panel from Fitted Squares using patterned paper and die cut a mat from Stitched Squares from Burgundy cardstock.  Stamp the sentiment on the patterned paper panel.  Attach patterned paper to Burgundy panel and mount onto the card front using foam tape, positioned as shown.
  3. Brush leaf edges with PanPastels.
  4. Adhere leaves, wreath and words as shown.
Supplies:
Imagine Crafts: VersaMagic Midnight Black
Elizabeth Craft Designs:
A Way With Words 4 Seasons  Quietfire site | Elizabeth Craft Designs
A Way With Words Thanks   Quietfire site | Elizabeth Craft Designs
Grapevine Wreath Round #1139
Stitched Squares #1118
Fitted Squares  #1119
Woodland Leaves  #1092
Core’dinations cardstock: French Roast, Roasted Pepper, Burgundy, Rich Amber, Scotch
Bo Bunny:  Autumn Song
Glue Dots
Elizabeth Craft Designs Clear Double Sided Adhesive
foam tape
PanPastels Permanent Red
 
 
Make sure you stop in at the other blogs and leave comments.  You must leave your comment before midnight October 2, 2016.  A winner will be randomly chosen from the comments below.  Here are the other places to visit and comment!
 
Selma http://selmasstampingcorner.blogspot.ca/
Robyn http://rainbowweaves.blogspot.ca/
Diana http://yourstrulybydiana.blogspot.ca/
Yogi http://yogiemp.blogspot.ca/
Kathy Jo http://daisysanddaffodils.blogspot.ca/
Teresa http://victorianpaperqueen.blogspot.ca/
Suzanne http://quietfirestyle.blogspot.ca/ (you're here now!)

Happy Hopping and Good Luck!
Suzanne

Friday, February 19, 2016

Happy Birthday Kitties

Luckily my oldest son doesn't do social media, so I can share his card before he gets it!

 
Obviously I needed a "guy" card.  For this child I should have gone with duct tape, but opted for his kitties and Tim Holtz bugs.  The kitties are a cutting file I created from a photograph I took of our furkids a few years ago. (One kitty has since gone to his great kibblebowl in the sky.) 
I think this card will hit the spot!
 
 
Supplies:
Quietfire A Way With Words Happy Birthday   Quietfire site | Elizabeth Craft Designs site
Quietfire Digital Cutting File Kitties Collection  Quietfire site | Silhouette site
Tim Holtz Idea-ology Wallflower Paper Stash
Core'dinations Nightfall, French Roast and Rustic cardstock
Elizabeth Craft Clear Double Sided Adhesive
Kool Tak Clear Foam Adhesive
twine

Instructions:
Okay, I mailed this before I took any of the measurements!  I think the final size was about 6 x 6"!

Since Core'dinations has a different coloured core, you will see the core colour along the edge of the cuts.  If you don't like that, use a different type of cardstock!

I think you can probably wing this design without me giving you the step by step instructions, right?

Enjoy your creativity time. Thanks for dropping in!
Suzanne

Saturday, February 13, 2016

Loving Heart Decoration

Here is a quick and easy project for Valentine's Day - or for anyone, anytime!


This was a wooden heart I picked up a long time ago. I think it's been waiting for this project... It was under $1, but it makes an such a sweet wall decoration! Add a little ribbon et voila!  Adorable!

Supplies:

A Way With Words Love die   Quietfire site | Elizabeth Craft Designs site
Elizabeth Craft Designs Soft Finish Cardstock - Perfect Pink
Elizabeth Craft Designs Clear Double Sided Adhesive Tape
Really Reasonable Ribbon - Pink ribbons
Wooden Heart
White paint

Instructions:
  1. Paint the wooden heart with white paint. Allow to dry.
  2. Diecut Love from cardstock backed with double sided adhesive.  Adhere to painted heart.
  3. Create ribbon loop and bow and adhere to heart.
Sweet!
Thanks for having a look!
Suzanne