Tuesday, February 24, 2015

Behind the Design - Stamp Organizers


There isn't too much of a story behind these designs.  It was a case of necessity is the mother of invention!

Since all the new Quietfire rubber stamps are mounted with cling and foam cushion, my traditional method of storing the stamps just wasn't cutting it.  So I decided to design and cut something new!
Both these designs require the use of the Silhouette Cameo or other 12" electronic cutting machine as the unfolded box is quite large.


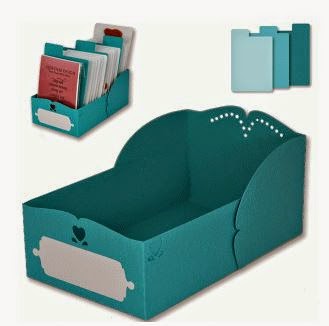
The smaller box, which you can find here on the Silhouette Design Store, perfectly holds the Quietfire single stamps on boards and the larger box is designed for the sets.  Each design comes with a little label for the front and includes dividers. 

It's kind of embarrassing how pleased I am with these boxes!  But it's great to have organization that works. And that looks cute, too!

Happy organizing!
Suzanne

Sunday, February 22, 2015

Clean and Simple Kraft Wedding Set

Kraft and white. Yummy! 
Here is a clean and simple look for a wedding! Combine the kraft look with white and a few classy embellishments and that's all you need.


Supplies
Stamp: Quietfire Design The Origin of Love
Ink: Tsukineko/Imagine Crafts VersaMagic Midnight Black
Quietfire Heart Wedding set

Cutting File: Quietfire Design SVG file Heart Wedding Invitation, Placecard & Favor Box
Cardstock: Little Bee Kraft and White Multi-Pack, Staples 110# White cardstock
Punch: Little B Honeycomb
Sticker Embellishments: Little B Wedding Cake
Glue Dots
Tombow Stamp Runner
Stamp positioner 
Be Creative Double-sided tape


Instructions
  1. Open the cutting file and separate all the elements.  Cut the card from the Kraft and White duplex (double-sided) cardstock. Cut the place card and favour box from plain kraft cardstock and the small hearts from white.
  2. Accordion fold the card. Continuously punch a 3-1/2" strip of white cardstock and adhere it to the front of the card as shown.
  3. Stamp the sentiment on the second panel of the accordion so it appears through the heart cut in the front panel.
  4. Adhere the Wedding Cake sticker to the heart that drops out when the front panel is cut and add to the third panel.  Hand write the invitation information where desired.
  5.  Continuously punch a 4-1/4" strip of white cardstock and cut in half lengthwise.  Adhere to the bottom edge of the place card as shown. Trim if necessary.  Add wedding cake and little flower embellishments.
  6. Assemble the favour box by folding all the score lines upwards, except the diagonal lines in the box top which must be folded the other way. Make sure the diagonals are well creased. Adhere the tab to the opposite side to create the box and fold up the bottom. Continuously punch a strip of white cardstock to about 6-1/2" and adhere around the outside of the assembled box. Trim if necessary.  Close the top by holding two opposite diagonal folds and push to the center. Adhere the loose hearts to the box top and add flower embellishments from the Wedding Cake set.
Place Card embellishment detail
Favour Box detail


Thanks for stopping by!
Suzanne