Tuesday, April 15, 2014

Illuminations Illuminated!

As you probably read about Illuminations on the Quietfire Creations blog, traditionally illuminated letters were gilded.  Today I've added a lot of contemporary techniques to a very old tradition!


Here is how I did this card. Thumbnail links to the products are below.

  1. Cut and fold white cardstock to 5x5" sidefold card.
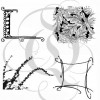
  2. Using VersaMagic Sage, stamp Morris leaves Illuminations onto vellum.  Allow to dry.
  3. Flip vellum over and use stamp positioner to center Capital Letter over Illuminations and stamp Capital Letter with Brilliance Galaxy Gold.  Emboss with Queen's Gold Embossing Powder.
  4. Die cut vellum with Spellbinders Decorative Labels 1 die.
  5. Mount vellum on card front using Scrapbook Adhesives Butterfly 3D Foam shapes.


Although not as smooth as I'd like, it makes a pretty good gilded letter!
Thanks for having a look! Suzanne


Saturday, April 5, 2014

Spring has Sprung on Scrapbooking.com


Here is one of the ways I've been using the Elizabeth Craft Designs All Seasons Tree. It's so versatile!   I fell in love with it with the Garden Bench at CHA.


This card may be seen with instructions on Scrapbooking.com HERE along with other great spring projects!  Don't miss it.
 You may get the All Seasons Tree from Elizabeth Craft or on the Quietfire website.  The links to the products I used in this card are below.


Thanks for dropping by!
Suzanne
 

Friday, April 4, 2014

Free eBook!

You might remember I was grovelling for votes a few weeks ago for my card entered in the Prime Publishing's Best Blogger Craft Contest! I ended up in the top ten, so thanks very much to all those who like this card and voted!


My card and all the instructions for this project are available in the new free e-book along with all the projects from Prime Publishing's Best Blogger Contest! My project starts on page 24. 

Click HERE to go to the FaveCrafts site to get your free copy!  Soon to be available on Amazon and Apple.
Happy creating! Suzanne
 

Illuminations Cards

  Image size: 348x350, 29.026Kb
  Image type: jpeg

I thought I'd share a little more detail about the three quicky cards I made to accompany the release of Illuminations 1. You may read more details about Illuminations 1 HERE.


The W Card
Instructions:
  1. Stamp Morris Illuminations on white cardstock using Distress Bundled Sage.
  2. Stamp Double Stoke W in center of decoration using Distress Chipped Sapphire and a stamp positioner.
  3. Die cut Illuminated letter with Spellbinders Labels One and die cut larger Labels One from blue cardstock. Layer as shown using Glue Dots.
  4.  Cut piece of ribbon and notch at bottom.  Adhere to Cardblank using Glue Dots as shown.  Adhere decorated letter panel to card front with Pop Dots.
Supplies:

The K Card
Instructions:
  1. Use VersaMagic Tea Leaves to stamp Barberry Illuminations on white cardstock.  Use stamp positioner to overstamp Capital K using VersaMagic Perfect Plumeria.
  2. Use Large Labels to diecut the Illuminated letter.  Die cut largest Large Labels from white cardstock.
  3. Layer ribbons (Mini Raffia Bows and Satin Pleated) and wrap around larger die cut adhering with tape. Use Pop Dots to adhere Illuminated letter panel to ribbon-wrapped panel.
  4. Cut and fold green cardstock to make tent card measuring 4" x 5-1/4"  Adhere decorated panel to card front using Pop Dots.

The R Card

Instructions:
  1. Use VersaFine Satin Red to stamp Contemporary Illumination on white cardstock. Use stamp positioner to overstamp Capital R in Deep Lagoon. Cut into diamond shape.
  2. Mat Illuminated letter with blue and red cardstock each 1/8" larger than the previous layer and adhere using Glue Dots.
  3. Mount panel on card front as shown.
Thanks for having a look!  Just ask if you have questions.  (send me an email if you're not able to check back here for my reply!
Suzanne


Here are some books you might like to check out.