Tuesday, June 24, 2014

Oh, Canada! New Cutting Files on the Silhouette Online Store

Happy early Canada Day! 
To help you celebrate, here are some timely cutting files!  As with any cutting file, you can alter the size or only use part of the design.

 That maple leaf was perfectly placed so I didn't have to worry about whether you were a Canadien or a Canadian!  But if you're reading this, you're probably Canadienne!
Pick and choose your phrase!
I am Canadi*n
Je suis Canadi*n
Je suis Canadi*nne
You can find I am Canadian on the Silhouette Online Store here.

Here is another that you can split up should the need arise!


 You may find Canada, eh? on the Silhouette Online Store here.

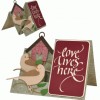
Here is a cutting file that had no end of uses!
Instructions: Open file and ungroup once. Cut six large pennants from red, six medium pennants from white and two each of the smaller pennants from red. Cut one of each C, N, D and three As from white. Assemble as shown. Add additional layered maple leaves as desired. Fold back scored tabs on largest pennants and glue down, leaving room to thread a ribbon or cord across the back. Hang it on your mantle, in your window or make a big one for your game or party!
They don't all have to be red and you can mix and match the smaller pennants however you wish.  You may find the CANADA cutting file on the Silhouette Online Store here.

 
 Have a safe and happy holiday! 
Thanks for stopping in.
Suzanne

Monday, June 16, 2014

This week on Silhouette Online Store

Hi there!
Thought I'd share a bit more detail about the Quietfire cards that are on the Silhouette store this week.

Since this funky pointed pen lettering is all the rage, here is a Print & Cut card using just that style! This is call just for you card.


This is a layered card that has all the cutting shapes, including the cardbase.  There is an extra circle included that isn't shown on the photo which can additionally be matted with the background frame. The mats are only 1/16" larger, so there isn't a lot of room for misplacing the shape, but it gives is such a classy accent that it's hard to resist making small borders. The possibilities for colour combinations are endless, but for this card I used Distress cardstock as the base and Kaisercraft Sweet Nothings for the frame.  All pieces were cut with the Silhouette Cameo.


The next one is coffee or tea card:
The shape was inspired by a Walnut Hollow sign and a project I did for Father's Day which you can see here.


This card was made using those exquisite Kanban paper which you can find on the Quietfire site here.  This is quite thick cardstock.  I cut it at setting 7, but I think you could double-cut at setting 5. The letters are cut from Recollections cardstock at setting 3 and the steam and cup base is from good old Staples 65# white cardstock, also setting 3.  You can just use one word or the other on this card by enlarging it to fit the panel.  The white background for the cup may be slightly offset as a dropshadow.  I used a Pop Dot to raise the cup and steam to give the card some dimension.

And last, but not least and because you can never have enough butterflies, here is a calligraphic butterfly placecard.  The wings drop down into the body of the place card and there is a matted panel for lettering a name.  It's hard to see on the online store, but there is a small cut out butterfly in the top panel.


This card is cut from Recollection cardstock at setting 3 and the decorative paper is Bo Bunny Little Miss, also cut at setting 3. Be a bit careful when you pull this card off the cutting mat!  Sometimes it's hard to know which part is suppose to stay and which part is suppose to come off!
I hope you enjoy these new designs.
Thanks for stopping by!
Suzanne

Sunday, June 15, 2014

Happy Father's Day, Barista! with the help of Walnut Hollow

When we first acquired an espresso machine, I made a mental note never to learn how to use it....  You know - in the theory that once you do it, it's your job....


So to celebrate x number of years of making Americanos for us, I made our barista (and Dad unit) this sign for Father's Day.  (He also got a blue bandana so he can be part of Gordon Ramsey's Hell's Kitchen, except he wore it every way *but* they way he was suppose to!  He always has been our Kitchen Chemist - and he has an apron to prove it!)

To make this, I chose a Walnut Hollow pine base.  I adore this shape! It's called the River Road Signboard and measures 12" x 9". I planned on painting it, but I love bare wood so much, I just left it.  I went with coffee coloured papers, but you could use any colours.  I tried a blue cup, but it just wasn't working for me, to I stuck with black.  Once my barista reads this, he'll probably demand a different colour....!


Instructions:
  1. Before you start gluing things down, you might wish to add a hanger to the back of the board!  I was so excited about working on it, that I didn't even think of it until we went to put it up on the wall!
  2. Cut one black rectangle measuring 11.25" x 5", one rectangle in dark patterned paper measuring 11-1/8" x 4-7/8", one rectangle of light coloured patterned paper measuring 10.5" x 4" and layer as shown.
  3. Enlarge the Barista image to 10.75" wide and use the Silhouette Cameo (or other electronic cutting machine) to cut two Baristas, one from white and one from black cardstock.  Layer the black behind, slightly offset, using it as a drop shadow and adhere together.  Center and mount on layered cardstock panel.
  4. Enlarge the cup and steam cutting file to 5" wide and use the Silhouette Cameo to cut the cup from black cardstock and the steam from white cardstock (Staples #65).  The drop shadows  images were cut from Core'dinations textured cardstock.  Assemble as shown.  (The cup and steam should be available on the Silhouette Online store tomorrow in a design called Coffee or Tea card)
  5. Use Pop Dots to attached the cup and steam to the board as shown.
Thanks for dropping by! Hope you're enjoying Father's Day.  Now we just have to decide where to go for dinner!
Suzanne

Supplies:
Quietfire Barista lettering on Silhouette
Walnut Hollow River Road Sign
Graphic 45 Kraft Recollections

Tuesday, June 10, 2014

Silhouette 24 Hour Flash Sale - Now!

Make sure you get over to the Silhouette Online store right away where all cutting files are 40% off regular price! Don't miss out!  (If you're receiving this as an email update, it might be too late.  Sorry! I was sworn to secrecy until the sale started!)

Here is a Father's Day card that you can make in minutes with the Quietfire dad card.


I didn't do anything fancy with the counterspaces of the letters, so it only took minutes to make!  I used Bo Bunny Timepiece paper (on the Quietfire site) and chipboard. And of course, Glue Dots!

Happy shopping!
Suzanne

Love Lives Here Step Card


Sometimes you get something in your mind and don't realize until too late that it's going to take you a  long time to complete!  This design had been brewing for a while and the longer I thought about it, the more it grew and grew!

The initial inspiration for this digital cutting file design came from a very sweet piece that Julia from WOYWW created which you can see here. My design morphed many times from there! I thought the project could use some birds and these were inspired by my friend, calligrapher Roy Elwen.  I met Roy when I lived in Newcastle-Upon-Tyne and he has been a dedicated correspondent ever since.  Roy passed away just before Christmas. I had an email from him several weeks before he passed away, in which he described his garden and the birds visiting it.  He mentioned Dunnocks.  I didn't know what a Dunnock was, so I looked them up.  Here, in honour of Roy, are my pair of Dunnocks. But you may turn them into any bird you wish.

This card, with it's small pieces, unexpectedly challenged me to use a variety of adhesives!  My favourite "go-to" is always Glue Dots, but even the Micro Glue Dots were a bit too big for some of these elements.  I found the Best Glue Ever had such a fine applicator and it's so sticky than it did a better job on tiny pieces of heavier cardstock than a glue pen I tried.  Pop Dots are great for dimension and the Stamp Runner is great for large panels.


The paper I used varied a lot, too.
I like American Crafts smooth cardstock because it cuts so cleanly and I used it in these colours:
Kraft, Dark Kraft, Orange and Vanilla
The leaves were Core'dinations cardstock
and "Love Lives Here" was cut from Beckett Cambric Beet.


The base of the card and the birdhouse are Heartfelt Creations paper - from their Daphne and Posey Patch collections.

You don't have to assemble this card exactly as I have - and you don't have to use all the pieces.  That's the great thing about having so many pieces in a design.  The variations are almost endless!
Happy creating!  Thanks for dropping by.
Suzanne

Here are thumbnail links to some of the supplies used in this project which can be found on the Quietfire site and the link to the cutting file on the Silhouette Online Store:

Monday, June 9, 2014

Marie's Tombow Bird Challenge

I just couldn't resist this challenge.  The Elizabeth Craft birdies have just come in and although I have other plans for them, I knew I could put them to use right away for Marie's Bird Challenge over on the Tombow blog!  If you haven't seen Marie Brownings birdie art, you really must click on the link and have a look.  It's completely awesome!


There is still time to enter, so go for it!  You must have a birdie somewhere!

So here is my little offering for that challenge.  I wanted to put the birdies on a background frame and ending up designing my own.  I wanted simple, but not too simple.

I really like the effect I get when I blend Tombow Dual Brush Pens with a waterbrush on Stonehenge paper.  Although Stonehenge was designed as a printmaking paper, it stands up to being wet and you can letter on it, too.

Instructions:
  1. Cut a 5" x 10" piece of Classic Crest 110lb cardstock, score and fold in half to create the card base.
  2. Use Birds 709 to cut 2 birds from Stonehenge.
  3. Use Tombow Dual Brush Markers (colours listed below) to add colour then blend colour using a water brush.  Allow to dry.
  4. Cut Knobby Frame elements from Neenah Classic Crest 80lb cardstock and Coredinations cardstock using the Silhouette Cameo (cutting file should be on the Silhouette Online Store later today).
  5. With the aid of a stamp positioner, use Purple Hydrangea ink to stamp Each of Us has a Song in the center of  the white frame and mat to the purple frame using the Stamp Runner.
  6. Use 3D Foam Tabs to mount the birdies facing the quotation as shown. (Tombow has tiny little 3D Foam tabs that are perfect for mounting the little birdies!  I think they're going to be my favourite soon!)  Use 3D Foam Tabs to mount the Knobby Frame to the card base.


Supplies:
Quietfire Each of Us Has a Song
Tombow Dual Brush Markers in 452 and 703 for the left birdie and 636 and 527 for the right birdie

Tombow 3D Foam Tabs
Tombow Stamp Runner
Elizabeth Crafts Bird 709
Tsukineko VersaMagic Purple Hydrangea
Niji Water brush
 Stonehenge
Neenah Classic Crest Solar White cardstock
Core'dinations cardstock


Thanks for stopping by to have a look.  Make sure you enter the challenge - there are prizes!
Suzanne

Here are thumbnail links to the products used in this project which are available on the Quietfire website:


Sunday, June 8, 2014

Masking Your Message - Illuminations - Just a Note

Here is another way to use Illuminations!

 Make a little gift card using a few items and a few simple steps....

Supplies:
Quietfire Illuminations 1
Quietfire Ten Tiny Tag Sentiments
3M Post-it Labelling and Cover-up tape - 2-Lines (1/3")
Neenah Classic Crest Solar White
VersaMagic Oasis Green, Ocean Depth
Stamp Positioner
Spellbinders Grand Calibur
Spellbinders die (um, er, I can't remember which one this is, maybe one of the SB DT can recognize it!)
Pop Dots


Lay down a strip of Post-it on white cardstock and stamp over it.


Peel off the Post-it.


Use a stamp positioner to align and stamp one of the Ten Tiny Tag Sentiments.
Die cut with a Spellbinders die and mount on a folded tag/card. 


Easy Peasy!
Thanks for dropping in.
Suzanne

Saturday, June 7, 2014

The New Colored Pencil: Create Luminous Works with Innovative Materials and Techniques

Coloured pencils are a must-have in my Studio-To-Go kit.  They are portable, inexpensive, and readily available, requiring little else to create “cool” effects on paper.  We all have pencil crayons in our stash, but do we really use them to their full capability?  “Cool” effects can go to stunning results with the information provided in this book. My tentative Craft Art can become Fine Art! 


When I was asked to review “The New Colored Pencil: Create Luminous Works with Innovative Materials and Techniques” by Kristy Ann Kutch, I was delighted to find a book filled with useful information, beautiful examples and exciting techniques with which to experiment.

 “The New Colored Pencil” incorporates many recent product and technique innovations in the pencil crayon realm.  It is well organized, with three sections; pencil crayons, watercolour pencil crayons, and pastel crayons, such as Caran d’Ache NeoArt and Lyra Aquacolors. It is easy to locate whatever information you might want to explore. Reference tables are included in each section and a comprehensive colour guide for major brands has been added in an Appendix.

Ms. Kutch gives us insight into the composition and construction of pencil crayons to ensure that we understand why one pencil is more suited to a specific style. And that’s just the tip of the iceberg. Surfaces are explored (and not just paper), along with methods like blending, brushing, grating, spattering and misting. In addition to application of color, we learn that there are almost as many ways to remove it! And I thoroughly enjoyed the variety of artwork shown by Ms. Kutch and her colleagues. Samples include flowers, landscapes, pets and portraits.

Ms. Kutch shares step by step processes detailing the use of the colored pencils in her many examples as well as possible pitfalls and how to minimize mistakes.  A section on colour theory and tips on composition give added value to this book.  There are more than enough morsels of inspiration to keep us exploring pencil crayon art for a long time.   

Coloured pencils are a must-have in my travel kit, and are always on my table as well. “The New Coloured Pencil” will be close by.  


The New Colored Pencil
 Create Luminous Works with Innovative Materials and Techniques
Kristy Ann Kutch
New York: Watson-Guptill, 2014
176pp. $24.99
978-0770436933


On Amazon.ca:The New Colored Pencil: Create Luminous Works with Innovative Materials and Techniques