
I thought I'd share a little more detail about the three quicky cards I made to accompany the release of Illuminations 1. You may read more details about Illuminations 1 HERE.
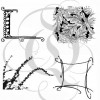
The W Card

Instructions:
- Stamp Morris Illuminations on white cardstock using Distress Bundled Sage.
- Stamp Double Stoke W in center of decoration using Distress Chipped Sapphire and a stamp positioner.
- Die cut Illuminated letter with Spellbinders Labels One and die cut larger Labels One from blue cardstock. Layer as shown using Glue Dots.
- Cut piece of ribbon and notch at bottom. Adhere to Cardblank using Glue Dots as shown. Adhere decorated letter panel to card front with Pop Dots.
Supplies:
The K Card

- Use VersaMagic Tea Leaves to stamp Barberry Illuminations on white cardstock. Use stamp positioner to overstamp Capital K using VersaMagic Perfect Plumeria.
- Use Large Labels to diecut the Illuminated letter. Die cut largest Large Labels from white cardstock.
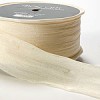
- Layer ribbons (Mini Raffia Bows and Satin Pleated) and wrap around larger die cut adhering with tape. Use Pop Dots to adhere Illuminated letter panel to ribbon-wrapped panel.
- Cut and fold green cardstock to make tent card measuring 4" x 5-1/4" Adhere decorated panel to card front using Pop Dots.
The R Card

- Use VersaFine Satin Red to stamp Contemporary Illumination on white cardstock. Use stamp positioner to overstamp Capital R in Deep Lagoon. Cut into diamond shape.
- Mat Illuminated letter with blue and red cardstock each 1/8" larger than the previous layer and adhere using Glue Dots.
- Mount panel on card front as shown.
Suzanne

Here are some books you might like to check out.


No comments:
Post a Comment