
When Imagine Crafts organized an ornament exchange, I though I can do this! And then I didn't know where to start. With many starts and stops here is what ultimately came about.

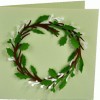
I used my Silhouette designs for both the ball and the wreath elements, but you may have Spellbinders dies that would do the same thing! I laid the wreath bits out this way:

I used five colours of cardstock and cut:
light green: 6 x 4.5" (broad leaves)
dark green: 6 x 6" (1 pine sprig and 2 holly)
brown: 6 x 5" (3 twigs)
white: 6 x 3.5" (3 berries)
red: 6 x 4" (flourish)
Lay the cardstock on the cutting mat in position for cutting the elements as shown above. As it turns out, I didn't use all the elements, but how you design yours may be completely different!
I cut the plain ball ornament, first resizing it to 5.43" tall and 4.24" wide.
Love is What's In the Room was stamped on the ball using VersaFine Crimson. Brilliance Pearlescent Thyme and Versamagic Hint of Pesto were blended around the edges of the ball. If you want a more vintage look, try Memento Pistachio and Toffee.

I applied Snow-Tex on the edges of the holly and pine leaves with a Spatula and spritzed the other elements with Goosebumps Texture Spray.

The wreath elements were bent and arranged around the edges of the ball and adhered with glue dots which I can reposition if I really don't like their placement!
I used a regular round paper punch to make red cardstock berries to add a little colour.

Because I thought the back was rather boring, I attached the flourished ball and thought it was fun to see that if the ornament was backlit, the flourish showed through! Cool! That was an unexpected bonus.

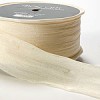
The final touch was choosing just the right ribbon as a hanger! Both are from May Arts.
Here is the Vintage colours version.

I sure hope the person who received this likes it!
Thanks for having a look! Suzanne
Here are the thumbnail links to the products used in this project. If the link doesn't work, it may mean the product is sold out or has moved on the site, so try searching right on the site!


very nice, Suzanne - I like the backlit flourish as well. Thanks for sharing how you did this!
ReplyDeleteThis is just gorgeous Suzanne.. you did an outstanding job with creating the whole thing... even the stamp :) I am always impressed.
ReplyDeleteBeautiful. I love the little touch on the back with the transparent quality of the paper. I'd love explore that part more. these would be stunning all over a tree, or as a little gift in a card or as part of the bow of a present. Oh the possibilities. I wish you were closer and I could learn how to do this kind of art better.
ReplyDeletesuz, st. albert, ab