Showing posts with label Mitchell Roundhand Nib. Show all posts

Sunday, March 31, 2013

Twinkling Happy Easter

Hi artlings!  Happy Easter! This "little" Easter project seemed quick and simple enough in my head, but somehow took much longer than I expected!
Easter Sunday is almost over, but I wanted to share this bevy of bunnies.  Ok, I know, not a bevy!
 

I wanted to decorate these buns in different ways. I drew this bunny years ago for a card-making class I taught, and it's been a template on the Techniques Pages for eons as a pdf.  The first time I made one, I covered it with a used dryer sheet to make it a fuzzy bunny.  When I printed the template out the other day, I was shocked to see how bad the quality was.  Bad Suzanne. So I got my fledgling Illustrator skills to work and remade The Buns.  He's much better now! There are two bunnies on the pdf now, one with the fold and one without.

I used 140lb Arches CP paper for this flock.  The paper was painted with washes of Twinkling H20's in pastel colours, then when dry, the templates were cut out. 


The turquoise buns was my attempt at stamping using the Twinkling H2Os.  I think I could have done better. The stamping solution was a more concentrated version of the background wash colour.  I brushed it onto the stamp.

 
The embossed bunny was done with the new Spellbinders Ornamental Swirls 3D Embossing Folder.  Holy smokes!  The depth of the embossing is phenomenal.  I did moisten the watercolour paper before I put it through the Grand Calibur, but it really wasn't a happy sandwich - a bit too thick for safety.  But, it's ok.  Our kitties survived the bunny sandwich shooting out the backside of the machine.  vbg!


The hand-lettered bunny was done with a more concentrated solution of the Twinkling H2Os.  It was applied to the Mitchell nib with a brush and lettered directly on the coloured watercolour paper.

 
I used the little flower in the Spellbinder's Page Maps Whimsy set and added a pearl to their centers.  The die cut buttons came from the same set.


Because the watercolour paper was so thick, I opted not to make a folded card, but instead I cut down the Tim Holtz Small Easel so it fit behind the bunnies and allowed them to stand up.


Hope you had a Hoppy Easter!  Now these little guys will be put away for next year....  Maybe I'll have twice as many when I open the bin next year!

Thanks for hopping in!
Suzanne


Saturday, February 23, 2013

Bienvenue Lyly!

 
The family face is changing on my husband's side.  Two of his sisters have become grandparents in the last few months!  (I am more than happy to wait for that experience - besides, I'm *far* too young to be a grandparent.....)

Bienvenue Lyly!  She's a real cutie from the photos! This card was made with a deadline - my husband is hand-delivering it to Montreal tonight! 


This little rocking horse is a Martha Stewart sticker I bought over a year ago.  It was quite the challenge to find coordinating paper.  But I dominated that challenge!

 
This is one of the new Spellbinders die sets, Radiant Rectangles.  I knew as soon as I saw it that this set would be very useful because it is rectangles and ovals.  Not only that, it's incredibly versatile.


The lettering was done with Mitchell Roundhand Nibs, sizes 1-1/2, 3-1/2 and 6 using a mixture of Schmincke Gouaches, White, Paris Blue and Chromium Oxide Green on Arches Text Wove paper. The little heart was made with a Gel Extreme.  Between finding the right paper and mixing the gouache to match, this card took quite a few hours and even then, you can see I didn't have the flow of the gouache optimized.
 
My French is so rusty that I had to Google the correct spelling. (but I was right before I checked.  All hope is not lost.)  This lettering was done with a Zig marker.  Mostly because it is instantly dry and I didn't have to worry about wrecking the card at this point!

 
Thanks for visiting! Suzanne
 
Here are thumbnail links to some of the items I used in this card.

Sunday, October 9, 2011

Happy Thanksgiving!


Happy Thanksgiving to all Canadians!


Card Synthesis
Ecoline Inks: Vermilion, Safron Yellow, Grass Green, Lemon Yellow
Tim Holtz Sizzlet Strip - Autumn Gatherings
Sookwang Be Creative Double-sided adhesive sheets
Glitter Ritz Microfine Glitter, Autumn Leaves set, Chartreuse, Peridot
Spellbinders Grand Nestabilities: Rectangles, Labels 4


Take it easy on the turkey!
Thanks for dropping by!

Wednesday, January 26, 2011

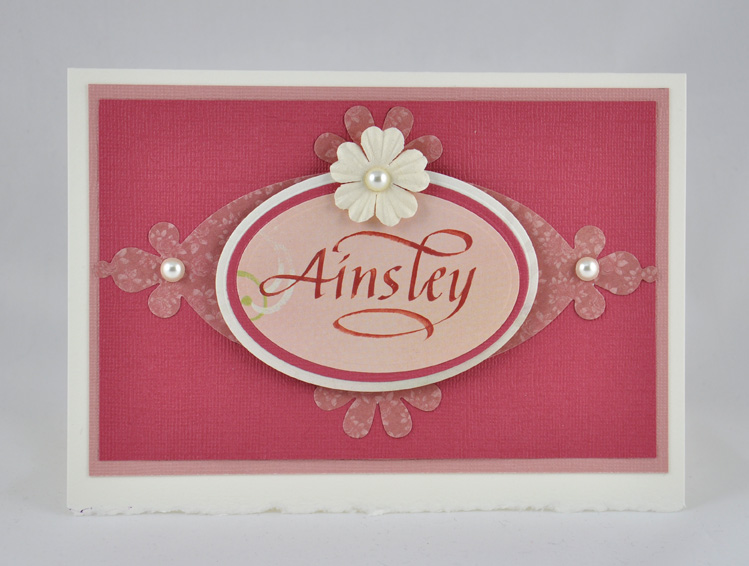
Ainsley

My friend Lizard had her first grandbaby recently.  She tries to be calm about it, but we know better!  Here is a card I made in celebration of the event.  Congratulations to everybody!


Card Synthesis:
Blank Greeting cards and Envelopes
Core'dinations Cardstock from the Nostalgia pack
Kaisercraft English Rose Decorated 6x6 paper pad
Spellbinder Wizard or Big Shot
Sizzix #5 Frame Back
Spellbinders Nesties Ovals: large and small
Mitchell #2 Roundhand Nib
Schmincke Calligraphers Gouache: Supra White and Red Pearl mixed together
Pop Dots
Double-sided tape
Paper Flower
Pearls

Tuesday, January 25, 2011

Congratulations!


This is a card I made for my calligraphy tutor Fred Salmon (more about that in another post later!).  This paper was good to letter on.  And yes, it is crooked.....  Don't ask!


Card Synthesis:
Mitchell Roundhand Nib
Walnut Ink
Blank Card and Envelope
Cosmo Cricket Wanted 6x6" paper
Spellbinders Wizard
Spellbinders Labels 4
Core'dinations cardstock - Nostalgia

Monday, November 1, 2010

Bon Appetit


Happy Halloween - a little late!
As soon as we discussed a Halloween Rolodex Swap, I knew what I had to do.  A coffin shaped card.

I hope you had a great Fright Night and found no spiders in your coffin!
Card Synthesis:
Coffin Template from the Quietfire Design Techniques Gallery
Black Cardstock
Dreamweaver web stencil
Dreamweaver Spider stencil
Dreamweaver Black Matte embossing Paste
Dreamweaver Glossy Black embossing Paste
Red Dot:  Gelly Roll Stardust
Mitchell Roundhand nib for original lettering
Higgins Eternal ink for original lettering
Bienfang 360 Graphics Paper for original lettering
Distress Ink: Black Soot and Antique Linen


Thanks for looking!  Happy creating, Suzanne