Showing posts with label Silhouette America. Show all posts

Friday, February 19, 2016

Happy Birthday Kitties

Luckily my oldest son doesn't do social media, so I can share his card before he gets it!

 
Obviously I needed a "guy" card.  For this child I should have gone with duct tape, but opted for his kitties and Tim Holtz bugs.  The kitties are a cutting file I created from a photograph I took of our furkids a few years ago. (One kitty has since gone to his great kibblebowl in the sky.) 
I think this card will hit the spot!
 
 
Supplies:
Quietfire A Way With Words Happy Birthday   Quietfire site | Elizabeth Craft Designs site
Quietfire Digital Cutting File Kitties Collection  Quietfire site | Silhouette site
Tim Holtz Idea-ology Wallflower Paper Stash
Core'dinations Nightfall, French Roast and Rustic cardstock
Elizabeth Craft Clear Double Sided Adhesive
Kool Tak Clear Foam Adhesive
twine

Instructions:
Okay, I mailed this before I took any of the measurements!  I think the final size was about 6 x 6"!

Since Core'dinations has a different coloured core, you will see the core colour along the edge of the cuts.  If you don't like that, use a different type of cardstock!

I think you can probably wing this design without me giving you the step by step instructions, right?

Enjoy your creativity time. Thanks for dropping in!
Suzanne

Friday, April 17, 2015

Behind the Designs - Lily, Ginkgo and Mom meet Art Nouveau

This week's cutting files are pretty straight forward, no tricky folds or assembling.  You can find them all over at the Silhouette Design Store. The two floral cards hold fond memories of things we had in our garden before we moved and I miss dearly!

The first one is a Calla Lily Card.  Calla Lilies are so beautiful. This card is perfect for anyone who loves flowers! When assembling the flower, mist the cardstock very lightly with water after it has been cut and it will begin curling all on its own. To give your leaves texture, use a ball stylus to add veins to the surface of the leaf. You can just do a single lily as I have done here, or make a whole bouquet. Along with the flower, you get a garden lattice frame! Assemble with foam adhesive for dimension.


We’ve given you a sweet butterfly to add to these unique Ginkgo leaves. To give your leaves texture, use a ball stylus to create veins on the surface of the leaf – there are lots on a Gingko, almost like stripes! In the spring the leaves are pale green, in the fall a golden yellow. I miss my Gingko! I bought it at Mandeville Gardens in Burnaby before we moved to the Island.  It stayed in a pot for 6 years before we planted it in the ground.  And then we moved.
Along with the Ginkgo leaves and lettering, you get an interesting frame which can be used in lots of other projects. This card measures 5x7 inches.


This is the cutting version of the calligraphic rubber stamp!  (You won't be able to cut this design as small as the rubber stamp, though!)
The original Foundational lettering was done with a Mitchell Roundhand nib and Higgins Eternal Ink.  Each of these words and the crown are separate so you may re-arrange them any way you wish.  This will fit on a 5x7" card front.


And last, but not least (in fact, watch for more items coming featuring this motif), is a design that was inspired by the glass in the door to our deck.... 

I've started to look at motifs and designs in a whole new way.  This motif is now the art nouveau flower card and envelope card and matching envelope with the same motif on the flap. You may want to make a coordinating insert to go inside the card for your message.

Thanks for taking a look!
Happy creating, Suzanne

Monday, March 30, 2015

Behind the Design: Heartfelt Creations Papers and Digital Die Cuts

I have this real love for Heartfelt Creations papers when I'm working on my samples for Silhouette America's Design Store!  It's definitely my go-to paper when I'm looking for something more interesting than plain cardstock, yet doesn't overpower the focal point of the design.  What prompted me to do this blog post was that all three designs I submitted this week used Heartfelt's Burst of Splendor Collection as well as the little lantern I did last week.

Easter Bookmark Tags
Easter Critters Votive Wrap


Pansy Card


I love their subtlety embedded images and how the colour fades to a lighter shade.  And of course how the colours within a collection coordinate.  I add in some solid cardstock (usually American Crafts smooth cardstock and Core'dinations cardstock) and I get the effect I want.


My favourite collection is Daphne and I did carry it for a while on the Quietfire site and it sold right out.  Unfortunately with the Canadian dollar doing what it is, I can't see carrying it again for a while.  *sigh*

Here is an Easter Bunny Flip card using Daphne papers.

Easter and Bunny Flip Card

Using the Posy Patch Collection and some plain cardstock:

Faux Gatefold Card
Always Card
Sometimes there is a bold design along the edges of the paper (which is perfectly normal seeing these are scrapbooking sized papers!), so I will move away from the edge to make use of the gentle designs.

From the Delicate Asters Collection:

Hello card with a bracket closure


Many of these papers work very well when you need a duplex paper (double-sided) with contrasting colours like in this card design.  I was one happy camper when I flipped it over. The Bunny Flip Card above is another example of a duplex paper that is very striking.  I've designed quite a few of those flip cards and it's a real treat to find patterned paper that works well with them. 


 All the above designs are available on the Silhouette Design store under my profile.


Here is a sample using the new Quietfire Believe metal die and quote.  This paper is from their Balmy Breeze collection and I loved that it coordinated with both American Crafts cardstock and Coredinations cardstock.


I don't have any affiliation with Heartfelt Creations other than liking what they do, but I wouldn't complain if I did!  Their papers are awesome!  And they work well with the Silhouette Cameo - but I'll think you've already guessed that!
Thanks for stopping by!
Suzanne

Monday, March 23, 2015

Washi Tape Hello and Document Corners

This project started out with me wanting to utilize some of my washi tape stash....  It evolved into the need to design a  digital cutting embellishment!


Quietfire Hello Metal die
This card was very simple!  When I had just Hello on the card, it looked a bit too simple but I didn't want to overwhelm the card with too much embellishing.  Years ago, my Mom was cleaning out her
stash and found these things called Document Corners.  So I pulled one apart to see how it was made.  The template for it has been on my website (somewhere!) for years. It's the basic template and was crying out for embellishment.  Now that I have this incredibly cool and amazingly accurate tool called the Silhouette Cameo, I converted the template into a cutting file and added some pizzaz to the plain jane document corners!

I could have make these with the same cardstock as the card base if I wanted to be *really* subtle, but I don't think the turquoise corners overwhelmed the Hello.  Hope you think the same!


Supplies:
Quietfire Hello Die
Washi Tape
Quietfire Decorative Document cutting file
Co'ordinations Bermuda cardstock
American Crafts Blush cardstock
Recollections turquoise cardstock
Pop Dots
Kooltack 3D Clear Foam Tape

Decorative Corners - Quietfire at Silhouette Design Store


Instructions:
  1. Cut a card base from Bermuda to 7 x 5".  Cut a panel of the same colour to 6 x 4".  Cut a Blush panel to 6.25 x 4.25". Adhere the 6 x4" panel on top.
  2. Lay strips of washi tape side by side on a piece of white cardstock.  Diecut Hello through the strips of washi tape.
  3. Cut decorative corners from turquoise and slide them on the Blush/Bermuda panel and adhere at the back.
  4. Adhere die cut Hello to center of panel and use Pop Dots to adhere the panel to the card base.

Thanks for stopping by!
Suzanne

Tuesday, February 24, 2015

Behind the Design - Stamp Organizers


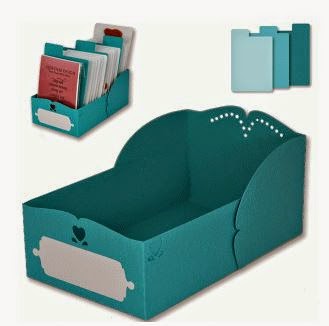
There isn't too much of a story behind these designs.  It was a case of necessity is the mother of invention!

Since all the new Quietfire rubber stamps are mounted with cling and foam cushion, my traditional method of storing the stamps just wasn't cutting it.  So I decided to design and cut something new!
Both these designs require the use of the Silhouette Cameo or other 12" electronic cutting machine as the unfolded box is quite large.


The smaller box, which you can find here on the Silhouette Design Store, perfectly holds the Quietfire single stamps on boards and the larger box is designed for the sets.  Each design comes with a little label for the front and includes dividers. 

It's kind of embarrassing how pleased I am with these boxes!  But it's great to have organization that works. And that looks cute, too!

Happy organizing!
Suzanne

Thursday, July 24, 2014

Quick Craft Room Organization with Silhouette!


If you have a Silhouette, we've made it super easy for you!  Just print and cut the labels and then you can colour coordinate with the backing colour of your choice!  Add some Glue Dots and voila!  Cute and functional!
This is the general set and can be found on the Silhouette site here.
 We have three sets - I tried to group them by theme, but it's hard!
This is the pen set and can be found on the Silhouette site here.
 All the lettering is done in a casual modern style.
This is the ribbons set and can be found on the Silhouette site here.
Team it up with our Washi Tape Organizer and it's too cute!!


Thanks for stopping in to have a look!
Happy creating, Suzanne

Tuesday, June 24, 2014

Oh, Canada! New Cutting Files on the Silhouette Online Store

Happy early Canada Day! 
To help you celebrate, here are some timely cutting files!  As with any cutting file, you can alter the size or only use part of the design.

 That maple leaf was perfectly placed so I didn't have to worry about whether you were a Canadien or a Canadian!  But if you're reading this, you're probably Canadienne!
Pick and choose your phrase!
I am Canadi*n
Je suis Canadi*n
Je suis Canadi*nne
You can find I am Canadian on the Silhouette Online Store here.

Here is another that you can split up should the need arise!


 You may find Canada, eh? on the Silhouette Online Store here.

Here is a cutting file that had no end of uses!
Instructions: Open file and ungroup once. Cut six large pennants from red, six medium pennants from white and two each of the smaller pennants from red. Cut one of each C, N, D and three As from white. Assemble as shown. Add additional layered maple leaves as desired. Fold back scored tabs on largest pennants and glue down, leaving room to thread a ribbon or cord across the back. Hang it on your mantle, in your window or make a big one for your game or party!
They don't all have to be red and you can mix and match the smaller pennants however you wish.  You may find the CANADA cutting file on the Silhouette Online Store here.

 
 Have a safe and happy holiday! 
Thanks for stopping in.
Suzanne

Tuesday, June 10, 2014

Silhouette 24 Hour Flash Sale - Now!

Make sure you get over to the Silhouette Online store right away where all cutting files are 40% off regular price! Don't miss out!  (If you're receiving this as an email update, it might be too late.  Sorry! I was sworn to secrecy until the sale started!)

Here is a Father's Day card that you can make in minutes with the Quietfire dad card.


I didn't do anything fancy with the counterspaces of the letters, so it only took minutes to make!  I used Bo Bunny Timepiece paper (on the Quietfire site) and chipboard. And of course, Glue Dots!

Happy shopping!
Suzanne

Love Lives Here Step Card


Sometimes you get something in your mind and don't realize until too late that it's going to take you a  long time to complete!  This design had been brewing for a while and the longer I thought about it, the more it grew and grew!

The initial inspiration for this digital cutting file design came from a very sweet piece that Julia from WOYWW created which you can see here. My design morphed many times from there! I thought the project could use some birds and these were inspired by my friend, calligrapher Roy Elwen.  I met Roy when I lived in Newcastle-Upon-Tyne and he has been a dedicated correspondent ever since.  Roy passed away just before Christmas. I had an email from him several weeks before he passed away, in which he described his garden and the birds visiting it.  He mentioned Dunnocks.  I didn't know what a Dunnock was, so I looked them up.  Here, in honour of Roy, are my pair of Dunnocks. But you may turn them into any bird you wish.

This card, with it's small pieces, unexpectedly challenged me to use a variety of adhesives!  My favourite "go-to" is always Glue Dots, but even the Micro Glue Dots were a bit too big for some of these elements.  I found the Best Glue Ever had such a fine applicator and it's so sticky than it did a better job on tiny pieces of heavier cardstock than a glue pen I tried.  Pop Dots are great for dimension and the Stamp Runner is great for large panels.


The paper I used varied a lot, too.
I like American Crafts smooth cardstock because it cuts so cleanly and I used it in these colours:
Kraft, Dark Kraft, Orange and Vanilla
The leaves were Core'dinations cardstock
and "Love Lives Here" was cut from Beckett Cambric Beet.


The base of the card and the birdhouse are Heartfelt Creations paper - from their Daphne and Posey Patch collections.

You don't have to assemble this card exactly as I have - and you don't have to use all the pieces.  That's the great thing about having so many pieces in a design.  The variations are almost endless!
Happy creating!  Thanks for dropping by.
Suzanne

Here are thumbnail links to some of the supplies used in this project which can be found on the Quietfire site and the link to the cutting file on the Silhouette Online Store:

Friday, May 23, 2014

Papillon Monarch Circle in action!

Oh, my! The gardens are so exquisite here right now.  My husband brought these peonies in (and left the ants outside, I hope) and I had to do something with them!


This is the papillon monarch circle available on the Silhouette Online store this week.


 I just cut the circle (I slowed the cutting speed) using my Silhouette Cameo and lay the design on the table.  The single monarch has a Glue Dot to hold it onto the petal!  I can use both over and over.  It just doesn't get much more simple!


Thanks for having a look!  Hope you're having a sweet day!
Suzanne


Friday, March 14, 2014

Easter Bunny Flip Card

Hi there!  I've been dying to make this card and I hope it shows up all right.  It's pastel colours that are perfect for spring, but often get washed out when I photograph them.

These are two digital cutting files newly available on the Silhouette Online Store (pst!  They're having a sale right now.  Great time to stock up on cutting files.).


This card works really well with double-sided designer papers.  You have to have paper that's at least 8 1/2" x 11" though.

Here is the card opened.
This card was so (bunny) quick to make; just cut, stamp and stick!


 And here it is from above.


Here are the supplies with direct links:
Bunny Flip Card electronic cutting file
Happy Easter electronic cutting file
Thinking of You rubber stamp
VersaMagic Pink Grapefruit ink
Scrapbook paper (I used some Heartfelt Creations that I had in my stash)
Mini Glue Dots

Thanks for having a look!
Suzanne